

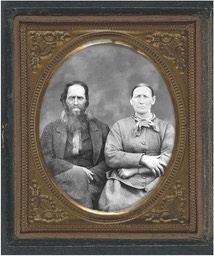
The top two images below, at left, side-by-side, and not framed with a black line are images of an image scan of an original tintype photograph, and, at right, a digital image of a repaired & restored image scan set in an original style oval-in-rectangle frame. How did the original top image, at left, become the digitally repaired & restored top image at right? The purpose of this website section is to show, and to explain, in a sequence of 10 photo image displays, the reasons and techniques that resulted in the digital tintype top image at right.
This website section on photo repair and restoration, using an actual Higdon historical photograph, including the steps involved with the image post-processing and the textual commentary, was created by Frank Mayfield.
Below, in the thumbnail 10 image display sequence, please find in the first image display a photo of Leonard Higdon & Mary Ann McClure that was used for two decades by the Higdon Family Association Website. The second image display in the sequence is a side-by-side comparison of lo-res and hi-res scans of a single image captured before the first image. What you see after the first two sequence display images are photos highlighting several different steps in the post-processing of the second image of the sequence, using a low resolution and a high resolution scan. This second image displayed in the thumbnail sequence was captured with a specialized tintype camera back when Leonard & Mary Ann were at age somewhere in their 40s and in some type of portable studio setting. In the remaining sequence image displays, you see 9 distinct points in the photo retouching process. There were many, many more action points. However, these 9 points plus the final restored image give you an excellent overview of the repair & restore process.


Last update for this page:
